This Onboarding Information is designed to help you seamlessly connect your CRM to Vendelux. Once connected, you’ll be able to view your sales pipeline within each event, including insights into deal owners and deal values. This integration brings greater transparency into how events contribute to your pipeline—whether you’re aiming to close deals, meet existing customers face-to-face, or revive winback opportunities.
Our goal is to make the onboarding process as smooth and straightforward as possible. If you have any questions, feel free to reach out to your Client Success Manager or contact us at [email protected].
Overview:
- We currently support Salesforce and HubSpot.
- You can integrate your CRM from within your Settings page
- While the CRM Integration Installation will ask for read and write access, write access (Push) is turned off by default. If your account plan includes CRM Push (Plus and Enterprise plans), you will be able to turn CRM Push on within your Settings page when enabled. If you are on the Pro plan, please contact your CSM for support!
- Once you’ve installed the CRM Integration, it usually takes about 24-48 hours for us to complete your onboarding. Your CRM data then continuously syncs with our platform daily.
- To provide the full benefits of integrating with your CRM provider, we’ll need read access to the following tables and the listed fields for each. You will also see which tables and fields we need access to when you install the CRM integration.
Salesforce Requirements
| Table | Fields |
|---|---|
| Account | Account ID, Account Name, Created Date, Deleted, Last Activity, Owner ID, Website |
| Contact | Account ID, Contact ID, Created Date, Deleted, Email, First Name, Last Activity, Last Name, Lead Source, Owner ID, Title |
| Opportunity | Account ID, Amount, Close Date, Contact ID, Created Date, Deleted, Last Activity, Name, Opportunity ID, Owner ID, Stage |
| User | Active, Created Date, Email, First Name, Last Name, Title, User ID |
| Campaign (CRM Push) | Read: Campaign ID, Created Date, Deleted, Name Write: Campaign membership (adding leads to the campaign) |
| Lead (CRM Push) | Read: Company, Created Date, Deleted, Email, First Name, Last Activity, Last Name, Lead ID, Owner ID, Website Write: Company, Created Date, Email, First Name, Last Name, Website |
HubSpot Requirements
| Table | Fields |
|---|---|
| Company | Close Date, Company Domain Name, Company name, Company owner, Create Date, Last Engagement Date, Record ID |
| Contact (CRM Pull & CRM Push) | Read: Contact owner, Create Date, Email, First Name, Job Title, Last Engagement Date, Last Name, Lead Status, LinkedIn URL, Recent Deal Close Date, Record ID, Record source Write: First Name, Job Title, Last Name, LinkedIn URL, Company, Email, Record source |
| Deal | Amount, Close Date, Create Date, Deal Name, Deal Stage, Deal owner, Last Activity Date, Pipeline, Record ID |
| Owner | Email, First Name, Last Name, Record ID |
| Segment (CRM Push) | Read: List Name, Processing Type, Object Type ID, Create Date, Record ID Write: Segment membership (adding Contacts to a segment) |
Note that these are standard fields across the most commonly used CRM objects. The fields in your CRM may differ in naming in various ways, but you must use the above fields in order for your CRM data to integrate. At this point in time, we don’t support partial access to data — we need access to all of the above tables and fields, though should we happen to not have a match for a field or two, this might be fine. If this is the case, please reach out to your Customer Success Manager to confirm if any missing fields would impact the integration.
HubSpot Scopes
These are the scopes required for our CRM integration to work. While we require access to write to your CRM for CRM Push, you have the ability to toggle this on or off on your Settings page. By default, we require access to write to your CRM so that you have a seamless CRM Push onboarding experience: once you’ve integrated your CRM integration, if your account is CRM Push eligible, then you are ready for CRM Push once it’s enabled for your account!
- oauth
- crm.lists.read
- crm.lists.write
- crm.contacts.read
- crm.contacts.write
- crm.company.read
- crm.company.write
- crm.deals.read
Salesforce Integration – Pre-Installation Checklist
Only one user for your Salesforce CRM needs to install the integration for your entire organization’s CRM data to synchronize with us. If your organization has more than one Salesforce instance, please contact your Customer Success representative.
Note on API usage: the number of API calls that the initial sync consumes depends on how much data are in your Salesforce Account, Contact, Deal, and User objects. To estimate how many API calls the initial sync will consume, use this formula: Sum of number of records for an object divided by 1000 for each object
- To install the integration, you MUST be a Salesforce administrator OR you have the Approve Uninstalled Connected Apps or Use Any API Client permissions. You can evaluate if your Salesforce edition supports API access by referring to Salesforce’s official documentation on API access by edition.
- Salesforce access tokens expire after a certain period. To ensure the integration continues working without interruption, you need to set your refresh token policy to “Refresh token is valid until revoked”. Procedure:
- Log in to Salesforce.
- Go to Setup.
- In the Quick Find box, search for Connected Apps.
- Click on Manage Connected Apps.
- Find and click on the name of the application you are integrating with.
- Scroll down to the OAuth Policies section.
- Look for Refresh Token Policy.
- Under IP Relaxation, select Relax IP restrictions.
- Make sure the refresh token policy is set to Refresh token is valid until revoked.
- Salesforce allows administrators to restrict which applications can access Salesforce data through APIs. You need to ensure that API access isn’t limited to only specific connected apps. To verify your API access control settings:
- Log in to Salesforce.
- Go to Setup.
- In the Quick Find box, search for Connected Apps OAuth Usage.
- Under the list of connected apps, find your app and click Manage App Policies.
- In the OAuth Policies section, ensure the Permitted Users status is one of:
- Admin approved users are pre-authorized – only selected users can access.
- All users may self-authorize – all users can access the app.
HubSpot Integration – Pre-Installation Checklist
Only one user for your HubSpot CRM needs to install the integration for your entire organization’s CRM data to synchronize with us. If your organization has more than one HubSpot instance, please contact your Customer Success representative.
- Verify app marketplace permissions
- To install and configure a HubSpot integration, your account must have the necessary permissions to access the App Marketplace. If you don’t have these permissions, you will need to request them from your HubSpot administrator.
- To check if you have App Marketplace permissions:
- Log in to HubSpot.
- Click on your profile picture in the top-right corner and select Settings.
- In the left sidebar, navigate to Users & Teams.
- Find your user account and check for App Marketplace Access permissions.
- If you do not have the required permission, ask your HubSpot admin to grant you access.
- For more information, refer to HubSpot’s official documentation.
Installing the Integration
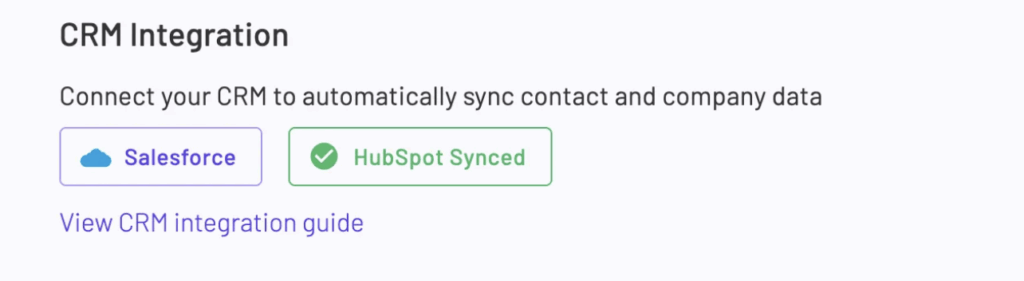
- While logged into Vendelux, navigate to your Settings page. Scroll down to the CRM Integration section.

2. Click on your CRM Provider. An OAuth modal will pop up. Proceed through the OAuth flow to reach the installation screen.
Salesforce Installation Modal:

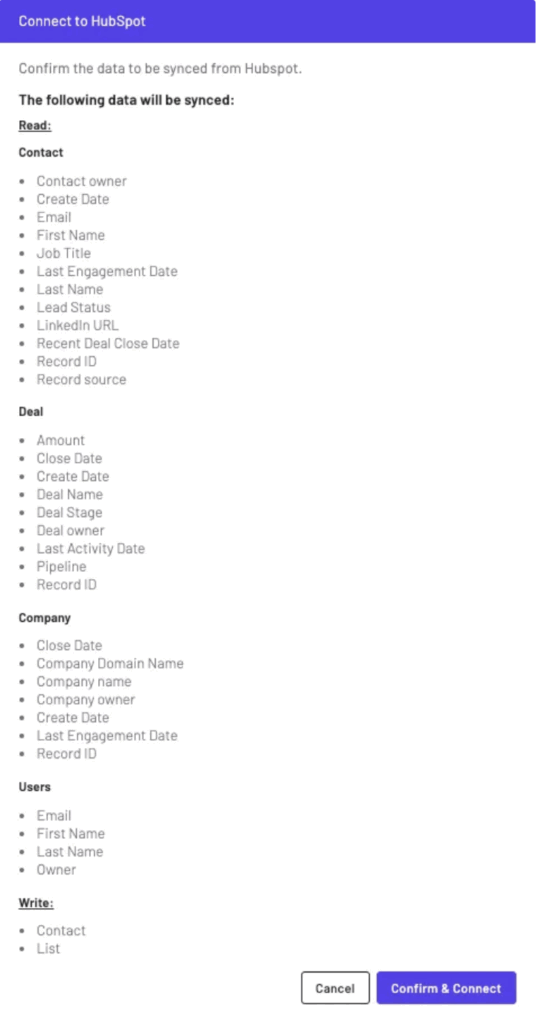
Hubspot Installation Modal:

3. Next, you’ll see the Installation Modal, which lists all the objects and fields Vendelux will read from and write to for the CRM integration. To get the full benefits of integrating your CRM with Vendelux, you need to sync all objects. Once you’ve reviewed the objects, simply click Confirm & Connect — and you’re done!
Hubspot Installation Modal:
Salesforce Installation Modal:
4. Once the Vendelux CRM Integration is installed, on your Settings page, you will see a green check and an indication that your installation was successful:
Troubleshooting
The most common issue that you’ll run into is Insufficient Permissions.
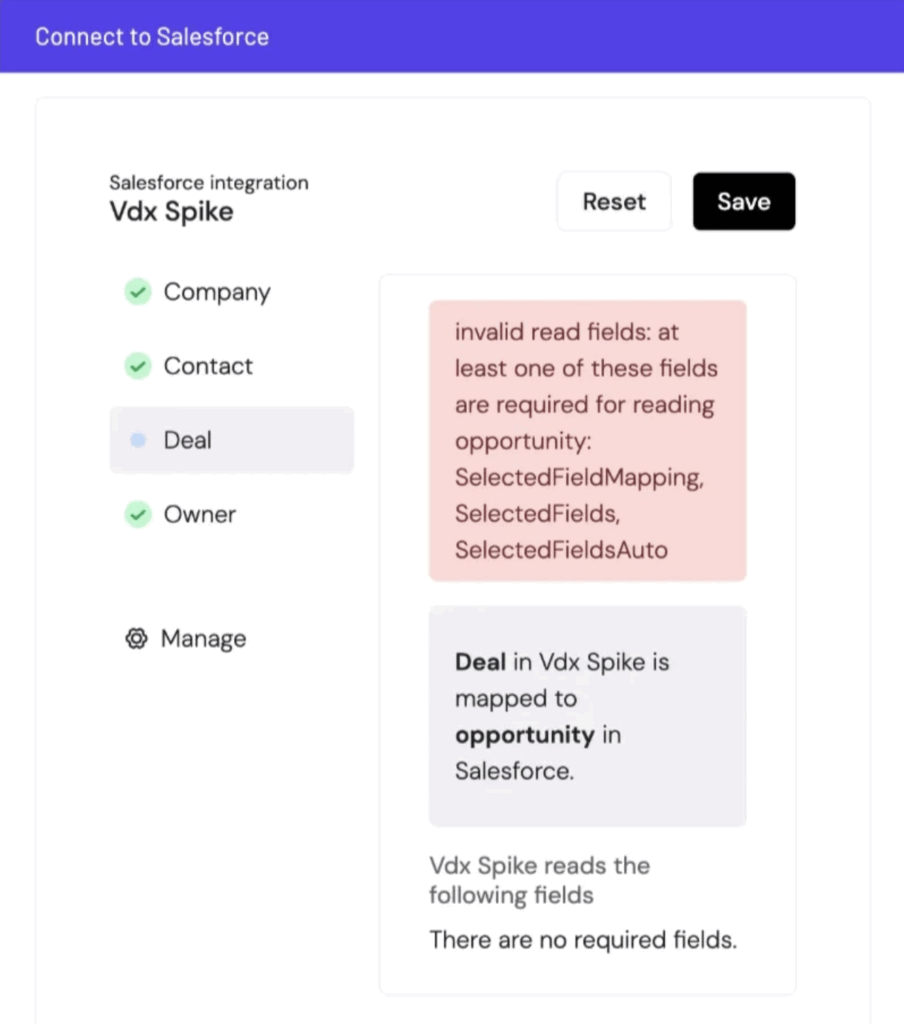
Insufficient permissions – Salesforce
If you are trying to connect to Salesforce and you do not have administrator-level permissions or lack the adequate permissions for a CRM object, you will see something like the screenshot below:
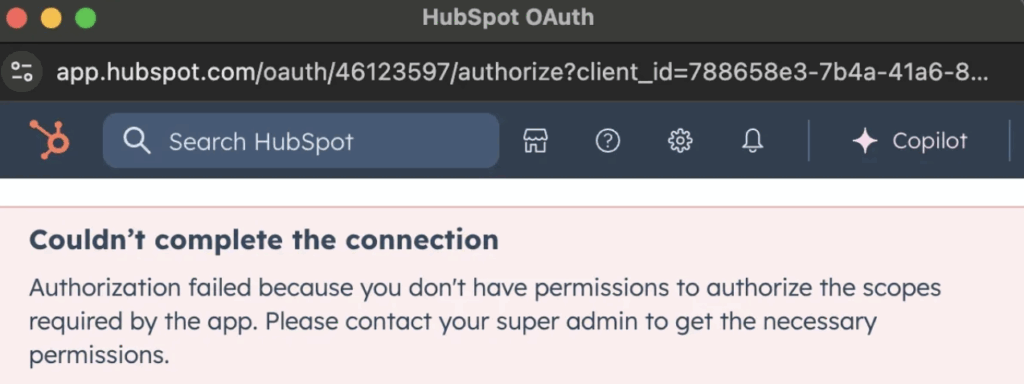
Insufficient permissions – Hubspot
If your account has insufficient permissions, you’ll see this in the popup window when installing the HubSpot integration:
If you have other issues, please reach out to your Customer Success Representative!
